House Inspection Checklist NZ: What to Check Before You Buy

An open home gives you perhaps half an hour in a house you might spend decades paying for. The agent is acting for the seller, the staging is designed to flatter, and while agents do have duties to disclose defects they know about, nobody in the process is employed to find problems on your behalf. That job belongs to the buyer. A systematic walk-through will not turn you into a building inspector, but it tells you which houses are worth a professional inspection, and sharpens the questions you ask before you sign anything.
This checklist covers the viewing and due diligence stage, from your first open home through to the checks you run once an offer is on the table. It is a different job from the pre-settlement inspection, the final walk-through shortly before settlement day, which is covered in its own guide. Your inspection screens properties and briefs the professionals; theirs, plus the paperwork and your lawyer, decides whether you proceed.
What your own walk-through can and cannot do
Your eyes, nose and hands are the tools here. You can spot stains, cracks, smells, sticking doors, tired paintwork and a roof line that sags. You cannot see inside walls, and neither can a professional inspector on a standard inspection. Consumer Protection points out that the standard pre-purchase inspection under NZS 4306:2005 is a visual inspection, so it will not identify problems concealed behind finished surfaces such as plumbing, framing, insulation or wiring. The inspector works from signs and clues: borer damage, rot, damp, structural movement, drainage problems, suspect wiring and faulty pipes, all photographed and recorded in the report.
Treat your own checklist the same way: clues, not certainties. Anything that looks wrong goes on a list for the inspector, a specialist or the paperwork to answer. Take photos, note things room by room, and if an open home is crowded, book a private viewing, as both Consumer Protection and Settled suggest.
Outside: cladding, roof and joinery
Start outside and walk the full perimeter before you go in. The exterior is where water gets in, and water sits behind most expensive building failures in New Zealand.
- Identify the cladding. Weatherboard, brick, fibre cement and monolithic plaster systems all age differently, and the cladding type drives much of the risk below.
- Look for cracks, gaps and holes in the cladding, and paint that is peeling, blistering or flaking. Failed paint on weatherboards lets timber rot, a classic deferred maintenance problem.
- Check the roof from the ground. Look for rust on metal roofing, cracked or slipped tiles, moss and lichen, any sagging along the ridge, and the state of flashings around chimneys and roof junctions.
- Follow the gutters and downpipes. Sagging spouting, rust stains below joints and downpipes that discharge at the base of the wall instead of into stormwater are all worth noting.
- Examine windows and exterior doors. Rotten timber frames, cracked putty, and condensation trapped between the panes of double glazing point to failed seals.
- Test decks and balconies. Look for worn or lifting waterproofing, loose balustrades and fixings pulling away. Decks built over living space deserve extra suspicion, because leaks land in the rooms below.
Inside: room by room
- Walk the floors slowly. Springiness, bounce, slopes and squeaks can point to subfloor or pile issues.
- Scan walls and ceilings for cracks, especially diagonal cracks running from the corners of doors and windows, which can indicate movement.
- Look for stains, bubbling paint and mould on walls and ceilings, particularly in corners and on the ceiling below bathrooms and the roof.
- Use your nose. A musty smell in a room or wardrobe is often the first sign of damp, and Settled notes it can be the trigger for ordering a proper moisture report.
- Open and close every door and window. Ones that stick, drop or no longer latch can signal movement in the framing, or simply worn hardware. Note which it looks like.
- In the kitchen, open the cupboard under the sink and look for staining, swelling or mould from slow leaks, and check benchtops and splashbacks for water damage.
- In bathrooms, ensuites and the laundry, press gently on flooring around the shower, bath and toilet. Soft or spongy flooring suggests long-term leaks. Check grout and silicone for gaps and mould, run the taps to test water pressure, look under the vanity for plumbing stains, and flush each toilet to check it refills properly.
- Find the hot water cylinder. Note its size and the age on its label if visible, and look for rust, weeping valves or damp around its base.
Subfloor and roof space
These two spaces tell you more about a house than any staged living room, and both feature in a professional inspection wherever they are accessible. At a private viewing, ask whether you can look, and take a torch. If access is blocked or impossible, note it: your inspector will record the same limitation, and it is a reason to be more careful, not less.
- Under the floor, look for piles that are leaning, cracked or no longer meeting the bearers, and timber showing borer holes or flight dust.
- Check the ground itself. Damp soil, puddling and a sour smell point to drainage problems or plumbing leaks overhead.
- Look for a ground moisture barrier, the black polythene sheet laid over the soil. Healthy homes rules require one in rental properties with an enclosed subfloor, and its presence or absence tells you something either way.
- Note whether there is underfloor insulation, and whether it is sagging, damaged or missing in patches.
- In the roof space, check insulation coverage and depth. Thin, patchy or displaced insulation means a colder, more expensive house to heat.
- Look for daylight through the roof, water staining on rafters and ceiling lining, signs of leaks tracking down from flues and vents, and borer in roof timbers.
Plumbing and electrical
You are not testing these systems like a tradesperson, and you should not open switchboards or remove covers. You are looking for age, condition and warning signs, because faulty pipes and suspect wiring are standard items in an inspector’s brief, and electrical faults are a job for a registered electrician.
- Run several taps at once. Weak pressure, hammering pipes or slow drainage from basins and the bath all deserve a question.
- Look at visible pipework under sinks, in the laundry and under the house. Black plastic water piping in a house built or replumbed around the late 1970s to early 1980s is a known leak risk and appears again in the red flags below.
- Glance at the switchboard from a safe distance. Ceramic fuse carriers, and cloth or rubber-sheathed cabling visible anywhere, suggest wiring of an age an electrician should assess. Note the number of power points too: one per room hints at the age of the whole installation.
- Look for obviously damaged fittings, scorched sockets or DIY-looking additions, and ask questions rather than touching anything.
Heating, insulation and ventilation
A warm, dry house is cheaper to run and kinder to live in, and these checks overlap with the healthy homes standards discussed further below.
- Identify the main fixed heating. A heat pump or a compliant wood burner in the main living area is what you want to see. Note the burner’s age and check the LIM later for its permit.
- Check whether bedrooms have any heating, or whether you would rely on portable plug-in heaters, which are expensive to run.
- Confirm extractor fans in the bathroom and kitchen, and whether they duct outside rather than into the roof space.
- Check that windows in living areas and bedrooms open and can be secured open, and look for mould on window frames and curtains, a sign of chronic condensation.
- Feel for draughts around external doors and windows, and look for gaps in skirting that suggest poor draught stopping.
Grounds, drainage and boundaries
- Walk the section after rain if you can. Ground that slopes toward the house, ponding water and blocked gully traps point to drainage work ahead.
- Check retaining walls for leaning, cracking and missing drainage holes, especially where they hold back a driveway or a neighbour’s section.
- Look at driveways and paths for cracking and lifting, and confirm downpipes and surface drains connect to a proper stormwater system.
- Find out whether the property is on mains sewerage or a septic system. The LIM will say, and an ageing septic system is a significant cost.
- Compare the fences with the apparent boundaries, look for any survey pegs, and note large trees close to the house or drainage lines. Encroachments become title and surveyor questions, not arguments at the open home.
- Inspect garages, carports, sheds and sleepouts with the same eye as the house, and note anything that looks added later. You will cross-check these against the council records.

The paperwork checks that sit beside the inspection
A physical inspection answers only half the question. The other half is in documents, and your lawyer should be involved before you sign, not after.
LIM report. A Land Information Memorandum is the council’s summary of what it holds on the property. Consumer Protection and Settled both list what it covers: building consents and permits, code compliance certificates, flood and erosion risks and other special land features, stormwater and sewage drains, rates owing, heritage protection and zoning. A LIM only reflects what the council knows. Settled gives the example that a weathertightness problem the council was never told about will not appear on it, so the LIM complements a building inspection rather than replacing it.
Council property file. The full property file usually holds more than the LIM, including the site plan and the original house plans. Consumer Protection suggests comparing those plans with the house as it stands: rooms moved, a garage converted, a deck or basement added. If the built house does not match the consented plans, you have found the most common paperwork red flag in NZ home buying.
Record of title. The title, held by Land Information New Zealand, confirms the owner, the type of estate, and interests registered against it such as easements and covenants. If the title is a cross lease, ask your lawyer to check the flats plan against the house as built, because alterations not recorded on the flats plan can make the title defective and expensive to fix. For a unit title property, Settled lists the body corporate disclosure statements, long-term maintenance plan and recent meeting minutes among the documents to obtain.
Run all three sets of checks on any house you are serious about. The inspection tells you work has been done, the LIM and property file tell you whether it was consented and signed off, and the title tells you what you are legally buying. Problems live in the gaps between them.
Your walk-through versus a professional inspection
A professional pre-purchase inspection is a different instrument from your checklist. It is carried out to NZS 4306:2005, the New Zealand standard for residential property inspection. The written report identifies significant defects, urgent and future maintenance, and gradual deterioration, supported by photographs. Many inspectors include non-invasive moisture testing, and some will let you attend, which Consumer Protection notes can cost slightly more but lets you see issues first-hand.
Know the limits. The inspection is visual and non-invasive: walls are not opened and floors are not lifted, so concealed defects can be missed even by a good inspector. Nor can it tell you whether work was consented. That comes from council records, which is why the paperwork checks matter just as much.
Choosing the inspector matters more than most buyers realise, because the industry is not licensed or regulated in New Zealand. Settled records that REA recommends an inspector who is qualified, carries professional indemnity insurance and works in accordance with the New Zealand Property Inspection Standard. Consumer Protection advises choosing an accredited inspector who complies with NZS 4306, suggesting members of the Building Officials Institute of New Zealand or the NZ Institute of Building Inspectors. BOINZ accredits building surveyors at levels: Level 1 covers residential property inspections to NZS 4306, and Level 2 covers specialist work such as forensic weathertightness reports. The NZ Institute of Building Surveyors represents Registered Building Surveyors, whose pre-purchase reports comply with NZS 4306:2005, are backed by professional indemnity insurance, and whose members have particular expertise in weathertightness investigation.
Treat a seller-supplied report with caution. Both Consumer Protection and Settled make the same point: the inspector’s contract is with the seller, not you, so you have little or no comeback if it misses something. Get your own report from your own inspector, and treat an agent-supplied LIM the same way: check its date, and consider ordering your own so the condition in your agreement works as your lawyer intends.
Making the inspection a condition of your offer
You can get an inspection done before you make an offer, or make it a condition of the sale and purchase agreement. The condition route is common, and Settled explains how it works: the report must be prepared by a suitably qualified building inspector, and if you rely on its findings to withdraw from the contract, you must give the seller a copy of the report.
Wording matters. Consumer Protection warns that small changes in how conditions are written can make a big difference to your rights: its LIM example shows a buyer whose ticked LIM condition only counted for a LIM they had ordered themselves, so a problem in the agent’s LIM gave them no exit. Have your lawyer check the agreement, including the building report and LIM conditions, before you sign. Once an agreement is unconditional, walking away becomes very difficult, so the inspection has to do its work inside the condition period. The seller also gives warranties in the standard agreement, including that work the seller carried out was done with any necessary permits and consents, but a warranty argument after settlement is a poor substitute for finding the problem beforehand.

Red flags that need a specialist
Some findings should stop the process until a specialist answers them. Consumer Protection flags several problem materials and conditions that are expensive to fix. Memorise them before you view.
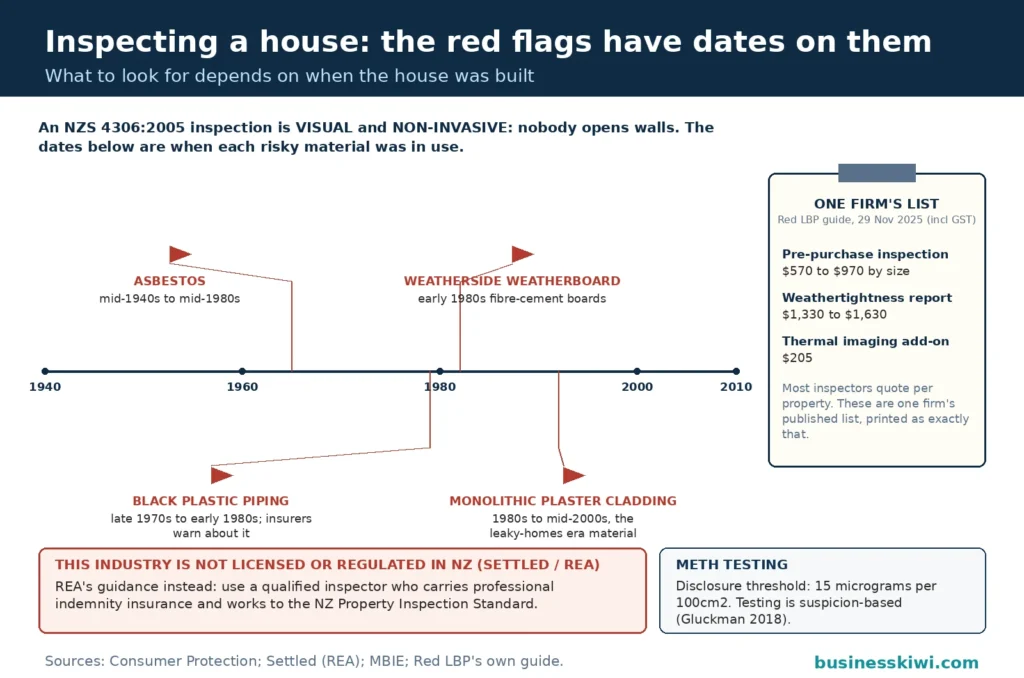
- Moisture and weathertightness failure. Monolithic plaster cladding, the smooth, unbroken finish used from the 1980s to the mid-2000s, is the cladding most associated with leaky homes. Combined with a musty smell, high moisture readings or interior staining, it calls for a specialist weathertightness assessment by a building surveyor, not just a standard inspection. NZIBS notes banks and insurers often require exactly that.
- Weatherside weatherboard. This manufactured weatherboard, found on some houses from the early 1980s, is known to leak and is flagged by Consumer Protection.
- Black plastic piping. Water piping used in houses built or replumbed around the late 1970s to early 1980s is known to leak, and Consumer Protection warns insurers are unlikely to cover damage from it if you knew it was there.
- Asbestos. Used widely from the mid-1940s to the mid-1980s in ceilings, roofing, under lino and fencing. Intact material is usually managed rather than panicked over, but get specialist advice on condition, risk and removal cost first.
- Unconsented work. Additions, moved plumbing, converted garages and dug-out basements with no consent on the LIM are a legal and practical problem. Building Performance confirms that exemptions from consent are not retrospective: work that needed a consent and never got one requires a certificate of acceptance from the council, with no guarantee one will be granted. Unconsented work can also create problems with house insurance and your bank.
- Methamphetamine contamination. REA guidance treats contamination at or above 15 micrograms per 100 square centimetres as a defect an agent must disclose to buyers, and agents must answer honestly if you ask directly at any level. The 2018 report from the Prime Minister’s Chief Science Advisor found no evidence of harm from third-hand exposure to residue at lower levels, and REA’s position is that testing is only really necessary where there is a strong suspicion of manufacture or very heavy use. If you have genuine grounds for concern, REA suggests asking your lawyer to add a satisfactory meth test as a condition of your offer.
- Structural and land issues. Significant cracking, out-of-level floors, retaining wall failure, flood-prone or slip-prone land call for a building surveyor, a geotechnical engineer or both. Consumer Protection lists earthquake damage, natural hazard exposure and boundary questions as triggers for specialist reports.
- Unexplained moisture readings. A standard inspection can flag damp without proving its cause. Consumer Protection advises following up, which may mean access behind a wall by a licensed building practitioner, a surveyor’s report or an engineer’s report, before you decide.
None of these automatically kills a purchase. Each reprices it, delays it or transfers a risk from the seller to you, and the point of checking is that the transfer happens with your eyes open.
Healthy homes standards: where the boundary sits
Buyers often ask whether a house meets the healthy homes standards. Those standards are a legal obligation on landlords for rental properties under the Residential Tenancies Act, administered by Tenancy Services. They cover five things: fixed heating capable of heating the main living room, ceiling and underfloor insulation, ventilation including openable windows and extractor fans in kitchens and bathrooms, moisture ingress and drainage including a ground moisture barrier where there is an enclosed subfloor, and draught stopping.
The boundary is simple. Buying a home to live in? The standards do not apply to you, and nobody will make you comply. Buying as a rental, or likely to rent the property out later? Compliance becomes your responsibility as landlord, and the cost of topping up insulation, adding a compliant heater or installing a moisture barrier belongs in your purchase calculations. Owner-occupiers can still use the five standards as a benchmark for warmth and dryness, and some inspection companies sell a healthy homes assessment as a paid extra.
What a professional inspection costs
Many inspectors quote per property rather than publishing a price list, because the fee depends on the size, age, construction and access of the house, so expect to ring around. Some firms do publish. Red LBP, an inspection company, publishes a pricing guide on its own website (prices as at 29 November 2025, including GST). Its pre-purchase report, which includes a written report, non-invasive moisture testing and a floor level spot check to NZS 4306:2005, is priced by floor area: $570 for an apartment or unit under 70 square metres, $670 for a house up to 100 square metres, then $770 for 101 to 200 square metres, $870 for 201 to 300 square metres and $970 for 301 to 400 square metres. Its dedicated weathertightness report runs from $1,330 to $1,630 on the same scale, and thermal imaging is an extra at $205 including GST.
Use those numbers as a calibration point, not a market average. Specialist reports and extras such as meth screening or a healthy homes assessment cost more, and a cheap verbal once-over is not the same product as an insured written report to the national standard.
Frequently asked questions
Can I rely on the building report the seller provides?
It is better not to. Its inspector was engaged by the seller, so the contract is with the seller and you have little comeback if it misses something. Consumer Protection and Settled both recommend your own inspection from an inspector you choose.
What does a standard pre-purchase inspection not cover?
It is a visual, non-invasive inspection to NZS 4306:2005, so it will not reveal problems hidden behind finished surfaces, such as framing, wiring, plumbing or insulation inside walls. It also does not confirm whether renovations were consented; that comes from the LIM and council property file.
How much does a building inspection cost in New Zealand?
It varies with size and complexity, and many inspectors quote individually. As a published example, Red LBP lists its pre-purchase report from $570 including GST for a small unit to $970 for a house of 301 to 400 square metres, with weathertightness reports from $1,330. Get quotes from at least two accredited inspectors.
Should I get the house tested for methamphetamine?
Only if you have real grounds for suspicion, such as evidence the property was used for manufacture or very heavy use. REA guidance, following the Chief Science Advisor’s 2018 report, is that contamination at or above 15 micrograms per 100 square centimetres must be disclosed by the agent, and testing is otherwise rarely necessary. If you are genuinely concerned, ask the agent directly and consider a meth test condition in your offer.
Does a house I buy to live in have to meet the healthy homes standards?
No. The standards apply to rental properties, and the obligations sit with landlords under the Residential Tenancies Act. Buy the property to rent out and you take those obligations on. Buy it as your own home and the standards are simply a useful checklist for warmth, dryness and ventilation.
What happens if the inspection finds a serious problem?
It depends on your agreement. If your offer was conditional on a satisfactory report and it reveals a major defect, you may be able to renegotiate, require repairs, or withdraw, giving the seller a copy of the report if you rely on it to exit. Talk to your lawyer first: the wording of the condition governs what you can do.
Sources
- Consumer Protection (consumerprotection.govt.nz), “Building reports and red flags”
- Consumer Protection (consumerprotection.govt.nz), “Prepare to make an offer”
- Settled, Real Estate Authority (settled.govt.nz), “Building inspections”
- Settled, Real Estate Authority (settled.govt.nz), “Piles of paperwork: all the documentation you’ll come across when buying a house”
- Real Estate Authority (rea.govt.nz), “New advice on methamphetamine contamination for real estate agents and home buyers”
- Building Performance, MBIE (building.govt.nz), “Work you can do without a building consent”
- NZ Institute of Building Surveyors (buildingsurveyors.co.nz), “Home buyers”
- Building Officials Institute of NZ (boinz.org.nz), “Accredited Building Surveyors Programme”
- Tenancy Services (tenancy.govt.nz), “Healthy homes standards: what a landlord needs to know”
- Red LBP (redlbp.co.nz), “Pricing Guide”
This article is general information about inspecting a house before you buy in New Zealand. It is not legal, building or financial advice, and it is no substitute for a professional property inspection, specialist reports where they are needed, and advice from your own lawyer or conveyancer about a specific property and agreement.